
Making swords from MDF and Fiberglass:
2B’s Virtuous Contract and Virtuous Treaty Walkthrough
What’s this? Another tutorial? Let’s get right into it!
During this instalment, I will show you how I made that base for my Virtuous Treaty and Virtuous Contract swords from NieR Automata.

Step 1: Lasercutting
First off, I got some good screenshots and traced the swords in Inkscape to get the files for lasercutting. Inkscape is a vector editor program, a little similar to Illustrator (or so I’m told), but totally free. Click here to download the files. These files are free, but please credit me when you use them, so others can find them as well!
The ZIP includes the whole swords in one piece as well as files with the swords cut into pieces to fit the 30cmx60cm lasercutter I used. The blade of the Virtuous Contract was cut out of 4 mm MDF twice, with different breaking points. This is so that it wouldn’t have a single weak point (a problem I had with the sword I made for Mikaela, which actually broke while I was sanding it – luckily I could still glue it again). The extra handles are also cut out of 4mm MDF, as was the crossblade. I find that a total thickness of 8-9 mm works really well for MDF cut swords. It is thicker than real swords, but they look better on pictures, aren’t flimsy and won’t break easily (don’t try to bash them together though!), and sanding an edge onto them is quite easy.
The Virtuous Treaty uses a few more layers. Unlike the Contract, I was planning on fiberglassing the blade, so that it wouldn’t break (I didn’t trust MDF on it’s own with such a long blade). I planned on giving the blade a thickness of about 9mm, and guessed that the fiberglass would add about 2 mm on both sides (spoiler: this was a huge mistake – it added almost nothing). I cut the blade itself out of 4 mm MDF. The handle, which is a separate piece, is made of multiple layers:
- a 9mm ‘core’ layer, which would have the same thickness as the blade (there are two versions of this core layer in the file, one with extra flaps that will give more support to the next layers when they are bolted over the blade, and one without, which is debatably more accurate – you can choose which one to use, I went with the flaps for support);
- a 6 mm layer on each side of the core that overlaps with the blade on both sides so that the blade can be screwed onto the handle;
- and a 3mm ‘fashion’ layer on top of those which doesn’t have a function but that’s how the design works.
- There is another fashion layer on top of that, which I cut out of 2mm foam (I forgot I traced this in inkscape and drew it by hand, so it looks a little different on the pictures).
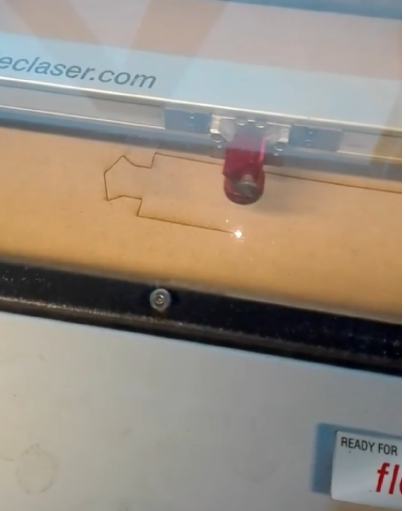
Virtuous treaty being lasercut.
Tip for finding a lasercutter: I cut my MDF at the FabLab in Leuven, which is free for personal use, as long as you upload your files for everyone to use. Another FabLab recently opened closer to my house, which asks you to purchase a yearly subscription (of only 5 euro’s!), but doesn’t require you to upload files. See if you have a FabLab or a Hackerspace in your vicinity where you might be able to use a lasercutter without breaking the bank.
Step 2: Assembly
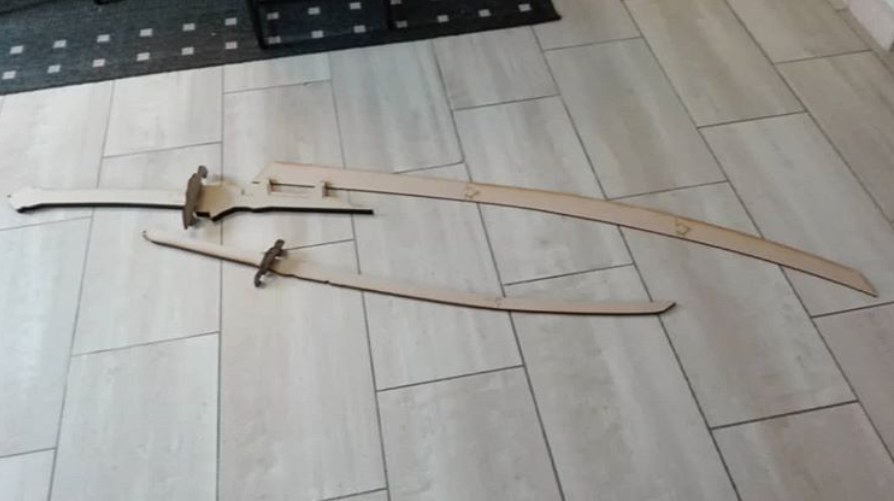
Assembly of the swords before gluing.
After all the pieces were cut, I laid all of them out on the floor, and labelled them, so that I wouldn’t make mistakes when gluing. Then, everything was glued together using normal wood glue. It is easiest if you ask somebody to help you. Wood glue works with pressure, meaning that you need to clamp your pieces together for them to stick. I usually make sure the pieces are aligned, while I have somebody put on the clamps and tighten them slowly. If you do not hold the pieces together, they might shift while tightening the clamps.
Important: don’t glue the blade of the Treaty to the handle, we will use nuts and bolts to keep them together. This way, we can take the blade apart for easy transportation.
Repeat until everything is glued together, and tadaa, your swords are starting to look like swords.
Step 3: Sanding
Next up is sanding the edge to your sword. I mark where I want the bevel to end, and the middle of the thickness of the blade. If you used two layers of wood, you already have this second line.
Then take a Dremel and carefully sand the bevel. I usually try to stop just a little bit short of the middle line. We don’t need these swords to be sharp, and if you sand down too much, you will get a curved sword.
Step 4: cover it with fiberglass and resin (optional)
Supplies needed:
- Epoxy resin
- Epoxy resin hardener
- Fiberglass fabric (I used 200mg/m2 fabric)
- Mixing cups
- Mixing stick
- Throwaway brushes
- Nitril gloves
- Sandpaper
- Overalls (if you want to protect your clothes, highly recommended)
- respirator
Fiberglass resin or epoxy resin?
Both fiberglass resin and epoxy resin are commonly used for fiberglassing. I decided to go with epoxy resin, because I heard it was less toxic, and might be less brittle. Please note: less toxic does not mean not toxic. Please read all safety instructions and wear a respirator and gloves!
If you are happy with the strength of your sword, you can stop here (and start on embellishments), but my swords would be used for on-stage battle, so I wanted them to be just a tad bit stronger. And of course, the Treaty also needed a lot more strength.
One of my friends suggested that I fiberglass the Treaty. You might have heard of fiberglass being used to strengthen pepakura helmets. Here, fiberglass mats are used to cover the paper, and then they are hardened with fiberglass or epoxy resin, after which you have to sand them down again.
During my research, however, I found another, slightly different method of fiberglassing, using fiberglass fabric instead of mats. This is a method commonly used to strengthen model airplanes, which are usually made of lightweight wood, but need more strength while not being weighed down too much so that they can still fly. It is less messy than fiberglass mats, and needs less sanding, but can’t be used for complex shapes (which the blade of a sword is not). Perfect.
To fiberglass a sword, you should first lightly sand the surface, and then wipe it to make sure it is clean. Apply a base resin layer first your resin will say how much hardener you should mix in. This first layer will mostly be absorbed into the wood. Once this layer is completely dry, sand again and cut out a piece of fabric a little bit bigger than the thing you want to cover. Put it on the blade and spread it out so it is flush with the wood. We don’t want air bubbles. Brush on another layer of resin, making sure it seeps through the fabric, then carefully scrape away excess resin.
You can either wait until your resin completely cures and sand it before adding a new layer, or you can wait until it is tacky and immediately apply a new layer before sanding. Add another 2-3 layers.
I waited until the first layer was completely dry so that I could sand down the excess fabric before adding more layers of epoxy. To get rid of the excess fabric, just sand the edge of your blade. The fabric will break right of where the wood stops.
When the last layer is completely cured, sand until you get the finish you want. Start with a lower grit and work your way up. The higher grit you use, the smoother your polish will be.
Tip:
Watch out for small pieces of fiberglass fabric. The fabric has a tendency to fray a lot, and unlike normal fabric, fiberglass likes to stick to everything and can be irritating to the skin. Gloves and overalls will help keep the fabric off of you, and having a small bin on hand to dump all stray pieces can be extremely helpful.
For the contract, I didn’t use fiberglass, and only covered the blade in epoxy. I’m not sure how much extra strength this gave, if any. However, it helps keep the blade in shape. MDF is quite soft, and blade points usually break down and become fuzzy after a while. Covering them with epoxy helps with this. Do make sure to file down the tip after the epoxy has cured though, because it might have become quite sharp. Be safe!
For normal walking on a convention floor, this should be quite enough strength. However, I’m definitely going to cover stage blades with fiberglass in the future, as accidents happen when fighting, and my contract actually broke during practice the night before the contest. Performing our skit with a hastily glued together sword was not ideal. However, with stronger and stronger con safety rules, I’m not entirely sure fiberglassed swords would be welcome on a con floor.
Step 5: Putting in the screws
The base for the Virtuous Contract is now entirely done and ready for detailing, but we still have to connect the blade and the handle of the Treaty. Look for a bolt that is a little bit longer than the width of the handle. You’ll need two. You’ll also need two screws and 4 washers (the washers aren’t absolutely necessary, but they look good).
Now drill out the holes until you can screw in the bolts. Start with a small bit and gradually increase the size. I used the pre-made holes as a guide for the handle, but redrew the ones on the sword, because I didn’t like the placement, and they were covered with fiberglass anyway. Put a wooden piece between the open parts of the handle (where the blade will go) so that the ‘tabs’ won’t break off. I heard that it is also good to put a wooden plank under your last layer, because the stress might cause the MDF to split.
Now that your holes are ready, slide the blade into the handle and screw in the bolts using a screwdriver. It is a good idea to have the hole be a little snug, so that when you screw it in (don’t just push it in and pull it out), it will cut the thread of the bolt into the wood, making sure nothing will shift. If you use washers, slide one onto the bolt before screwing it into the wood, and then slide one on before you screw on the bolt.
You can now assemble and disassemble your sword as often as you like!
External links:
Here are some video’s to people who know how to work with fiberglass and epoxy resin far better than I do. Watch them for some helpful tips!
https://www.youtube.com/watch?v=ujk-wBQDUSk
https://www.youtube.com/watch?v=ZKS_bzB1JP4
Detailed video explaining the types of fiberglass on the market